

Welcome to documentation for how to add your own Random Events to the map.
This documentation is split into two parts:
A) How to Write an Event
B) Reference of all the stuff you can do.
Oh, and here are the the files that will help you out and save you time EventsHelpfulFiles.zip
A) How To Write an Event
I assume people interested in doing this are more capable writers and role-players than coders. I tried to write the guide ‘low-tech’ and keep the technical details in the Reference documentation.
1. Concepts
What a Hex Event Is
A short, self-contained piece of interactive narrative (role playing) that appears while traveling the world map. When triggered, it pauses movement and presents the player with a situation, choices, and outcomes.
A Hex Event is made up of Stages.
What is a Stage?
A Stage is one complete screen shown to the player.
If the player sees a single window with text and buttons, they are looking at one Stage.
Each Stage contains three main parts:
HexEvent Title
Displayed at the top. This stays the same for the entire event.Stage Text
The main body text. This describes the situation, discovery, or result the player is experiencing right now.Options
The buttons the player can click. Each option leads to:
another Stage
a skill check
or the end of the event
Visually, a Stage looks like this:

Important things to understand about Stages
A Hex Event can have one Stage or many Stages
Each Stage is shown one at a time
Choosing an option always moves the player to another Stage, even if it is just a short ending
Stages do not loop unless you explicitly tell them to
If no options are provided, a leave option is automagically added. This saved us a lot of time.
Writers should think of a Stage as:
“What the player sees right now, before they click anything.”
Multiple Versions of a Stage
Some events contain multiple possible opening Stages. Why? Because we can get more mileage out of one event idea presented differently. We find it more manageable to have 3 different openings to finding a dead body that has something on it than to create 3 separate events. See later where I describe Randomization.
In this case:
The game randomly picks one Stage from a list
Each version describes the same kind of situation in a different way
For example:
One corpse might have a note
Another might have a journal
Another might have a sealed case
These are still separate Stages, even though they share the same event title.
How Options Work
Options are the choices the player can click at the bottom of a Stage.
Every Option answers one question:
“What happens if the player chooses this?”
An Option always leads somewhere. There is no such thing as a dead button.
What an Option can do
When clicked, an Option can:
Move the player to another Stage
Trigger a skill check
End the event
Give rewards (XP, gold, items)
Do several of the above at once
Writers do not need to think about how this is coded.
You only need to decide what happens next.
Options always belong to a Stage
Options are part of the Stage the player is currently viewing.
If the player sees:
One paragraph of text
Two buttons
That is one Stage with two Options.
Each Option represents a different branch in the event.
Simple Options (no skill check)
A simple Option just moves the player forward.
Example (in plain language):
Examine the body
Shows descriptive text, then returns to the same choices.Read the note
Shows the note and ends the event.
From a writing perspective:
You write the button text
You write what the player sees next
That is it.
Options with skill checks
Some Options test the player’s abilities before deciding what happens next.
A Skill Check rolls a d20 using a specific player stat and compares the result against a Difficulty Class (DC). Based on the result, the event moves to a different outcome Stage.
From a writer’s point of view, a skill check is simply:
“Try this. It might work, or it might go wrong.”
What a Skill Check requires
Every skill check must define:
Stat – which player stat is being tested
DC – how difficult the task is
Success outcome – what happens if the check succeeds
Failure outcome – what happens if the check fails
If any of these are missing, the event will break.
How the roll works
Behind the scenes, the game:
Rolls a d20
Adds the player’s skill stat
Compares the total to the DC
Chooses the appropriate outcome Stage
By default, this roll is hidden from the player, but it is possible to show the full roll result if you really want.
Types of outcomes
In addition to normal success and failure, the system recognizes stronger and weaker results.
You can choose to write special text for these, or let them fall back to normal success or failure.
Critical Success
Occurs when the d20 roll a natural 20
Represents an exceptionally good outcome
Critical Failure
Occurs when the d20 roll is a natural 1
Represents a disastrous outcome
Noteworthy Success
Occurs when the total (roll + skill) is +10 or higher than the DC.
Represents success well beyond expectations
Noteworthy Failure
Occurs when the total (roll + skill) is -10 or lower than the DC
Represents failure that goes especially badly
Writing Skill Checks as a storyteller
When writing a skill check, always ask:
What happens if this works?
What happens if it fails?
Is there anything interesting if it goes very well or very badly?
You can keep things simple with just success and failure, or add richer outcomes for critical or noteworthy results.
Options can disappear after being used
Options can be set up so they only appear once.
This is useful for appealing to different kinds of players and roleplay. A more lore oriented player or cautious player will want more details provided by examining an object before making a decision. A more action oriented player will just make a straight up decision to see what happens. You can present the ‘problem’ and allow the player to gather more information through disappearing options (like examining a body) while still showing the ‘move forward’ options every time.
Example flow:
Examine body (only available once) - provides more context, detail
Read note (ends the event) - provides outcome
After examining the body, that option disappears and only the remaining choices are shown.
This allows players to explore without repeating the same action.
An Event Ends When There Are No Options
Put in text, put in action outcomes, just leave the options area blank, and this is where the Event will stop.
How writers should think about Options
Think in terms of intent:
Is this option Interesting compared to the other choices? This is harder than it seems. It’s very easy to have one interesting sounding option and the rest far less appealing. The goal is to make the Options equally appealing.
What reward is there for risk? Is there lower reward for negating risk?
Offer roleplay opportunity by providing at least two different options: One for a persona type (say, confident or lawful good) and the opposite (say, cautious or chaotic good or lawful evil).
Randomization
Archmage Rises is built with replayability in mind - it is inevitable a player will encounter the same event multiple times, but it doesn’t have to play out the same way. This is the strength of rogue-likes.
A Hex Event can contain multiple possible versions of the same moment. When the event triggers, the game randomly selects one of these versions based on assigned weights.
From a writer’s perspective, this means:
The same event can feel different each time
Players cannot predict outcomes with certainty
Repeated encounters stay interesting
Randomized Stages
An event may define several alternative Stages at the same point in the event.
Each Stage:
Represents a different version of the situation
Is written as a complete, self-contained screen
Is mutually exclusive with the others
Only one of these Stages will be shown when the event begins.
Weights and probability
Each randomized Stage has a weight that determines how likely it is to be chosen.
Weights are relative, not percentages, and do not need to add up to some number like 10 or 100.
Example:
Stage A weight: 1
Stage B weight: 1
Stage C weight: 1
All three are equally likely.
Example with bias:
Stage A weight: 20
Stage B weight: 10
Stage C weight: 10
Stage A is twice as likely to appear as either B or C.
The exact numbers do not matter. Only the ratio between them does.
We have found it easy to think in terms of 100, so we often weight 3 options as (33, 33, 33).
When to use randomization
Randomization works best when:
You want uncertainty or surprise
Different outcomes fit the same narrative theme
Common uses include:
Representing NPC decision making - they may be predisposed to like you one time, or dislike you another.
A creature may be injured and survive its wounds, or succumb to them.
Randomization is not branching
Randomization happens before the player makes a choice.
Once a Stage is chosen:
The event proceeds normally
Player decisions matter as usual
The path is no longer random unless you add more random stages later
Think of randomization as:
“Which version of the situation do you walk into?”
Not:
“What happens because of your choice?”
Writing advice
Use randomization to keep the player interested - if choosing “wave hello” leads to two or more possible outcomes, it becomes a roleplaying choice “How do I want to respond?” instead of something to lookup on a wiki for a specific outcome.
2. Setup
Find your game save file location.
Windows:
%USERPROFILE%\AppData\LocalLow\Defiance Game Studio\ArchmageRisesMac:
~/Library/Application Support/Defiance GameIf you are having trouble locating it, look up Unity
Application.persistentDataPathonline.
Create a new folder called
DataInside
Data, make two folders:Hex Events(with the space) - this is where you will put your hex events. Any files ending in.jsonhere will be loaded when data is loaded.Note: It is OK to organize events in subfolders under here, it will find them.
Schemas- This is where you will put the Schema JSON file so you get nice intellisense in Visual Studio.Note: Notepad++ does not give you nice intellisense like Visual Studio.
Now launch the game
Console Commands You Will Need
Access console with tilda (next to your 1 key) `
Reloading Hex Event JSON
You can reload changes to hex event JSON live without restarting the game through this command:
HexEvents.Reload
Spawning A Specific Event
A GUID is a Globally Unique ID
we use plain text like “DeadNote01” for our GUIDs not goofy text like “6F9619FF-8B86-D011-B42D-00C04FC964FF”
GUIDs are Case Sensitive!!! It is “DeadNote01” not “deadnote01”, the first will work, the second won’t.
HexEvents.SpawnHexEvent GUID
If you want to spawn DeadNote01 you type into the console:
HexEvents.SpawnHexEvent DeadNote01
That’s all you need, off to making events!
3. Your First Event
We will start with a small, simple, and complete event. Without skill checks, randomization, or branching logic.
It will:
Show some text
Give the player one choice
End cleanly
The goal is to prove to yourself that you can make a working event.
Writing Tip!
Because of the branching nature of events, I personally find it very hard to write in word processors like Word or Google Docs. I prefer Xmind 8, a fully featured free mind mapping tool I’ve used for many years - and it just happens to be perfect for branching narrative.
You can download the free non-subscription non-cloud based one here: Xmind 8.
I write the structure of the event in XMind, make sure I have all my paths covered, text is correct, before moving onto JSON-ing it.
OK, confession, I didn’t JSON many of my events - Michel did.
Then when he wasn’t able, I trained AI to do it for me. 😛
Step 1: Write the situation
Start by writing what the player sees when the event triggers.
This should be:
One short paragraph
Second person, Present tense
Describing a single moment
Example:
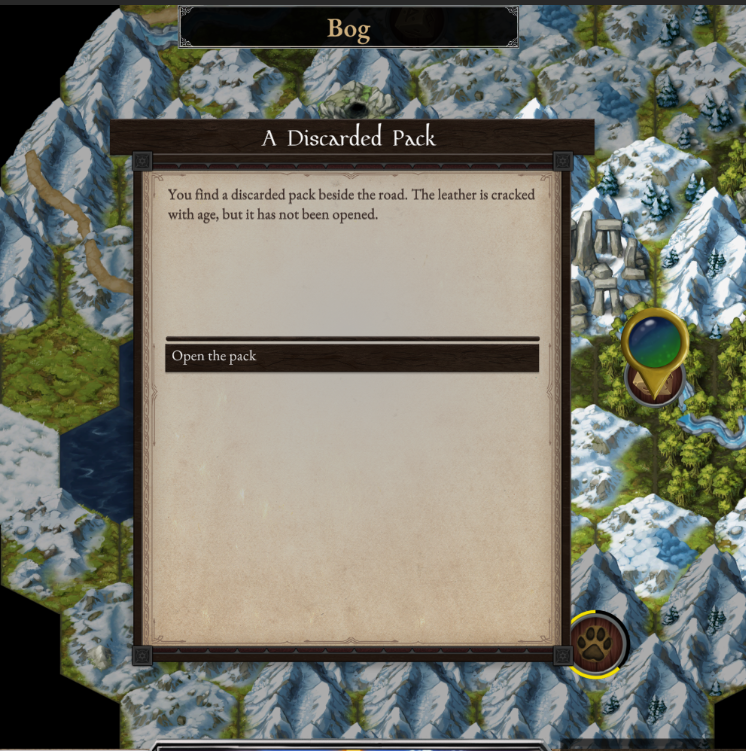
You find a discarded pack beside the road. The leather is cracked with age, but it has not been opened.
How long of a paragraph can I write?
While the description text will vertically scroll, ideally don’t use it.
Fit your text into 65 words, 445 characters, about 7 lines of text.
It’s better User Experience (UX) and engagement to read 65 words, then have a ‘continue’ option, then read 65 more words than to hit a block of 130 words all at once.
Here is an example max paragraph size without scrolling:
Lorem ipsum dolor sit amet, consectetur adipiscing elit, sed do eiusmod tempor incididunt ut labore et dolore magna aliqua. Ut enim ad minim veniam, quis nostrud exercitation ullamco laboris nisi ut aliquip ex ea commodo consequat. Duis aute irure dolor in reprehenderit in voluptate velit esse cillum dolore eu fugiat nulla pariatur. Excepteur sint occaecat cupidatat non proident, sunt in culpa qui officia deserunt mollit anim id est
Step 2: Decide what the player can do
Now decide what the player can click.
For this first event, let’s just do one option.
Examples:
Open the pack
Examine the contents
Leave it alone
This keeps things simple and avoids mistakes.
Step 3: Write the outcome
Next, write what happens when the player chooses that option.
This is the final Stage of the event.
Example:
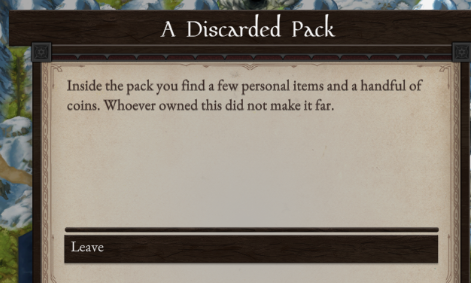
Inside the pack you find a few personal items and a handful of coins. Whoever owned this did not make it far.
This outcome Stage:
Can give rewards
Can be purely narrative
Has no further options
Once this text is shown, the event ends and the player continues traveling.
Writing Tip!
The game automatically tells the player what they gained (XP, gold, items) you do not need to add it to the description text. Most of the time you can’t anyway, because the reward is randomized and you don’t know exactly how many coins they receive.
Step 4: Turn it into a Hex Event JSON
Once the writing is done, you translate it into JSON.
Warning: JSON is very particular, a single comma missing or extra will prevent the whole thing from working. Which is why you want to use a real JSON editor instead of just winging it with Notepad or VI.
At the top of every hex event is the header info. This tells the game how to display it. This header allows you to write an randomly occurring event. I describe
At a minimum, your event needs:
A title
One Stage with text
One Option
One ending Stage
Everything else is optional.
Here is our example, which I saved as UGC.json. The filename and the GUID and Title do not need to match:
{
  "$schema": "../../Schemas/HexEvents.schema.json",
  "guid": "ExampleFirstEvent",
  "title": "A Discarded Pack",
  "tags": [ "Random" ],
  "displayAs": "Random",
  "root": {
    "text": "You find a discarded pack beside the road. The leather is cracked with age, but it has not been opened.",
    "options": [
      {
        "text": "Open the pack",
        "next": {
          "text": "Inside the pack you find a few personal items and a handful of coins. Whoever owned this did not make it far."
        }
      }
    ]
  }
}
What success looks like
A successful first event:
Triggers without errors
Shows text
Lets the player make one choice
Ends without crashing
The above actually works!
I ran the command from the console: HexEvents.SpawnHexEvent ExampleFirstEvent
Clicking the option worked, showed our second singular default Stage and ended the event. Note how we get the Leave button for free when there are no options specified.
Congratulations, you made an event that worked. Have a celebratory ice cream!
Step 5: Adding Reward ACTIONS
OK, the above celebratory ice cream was a bit pre-mature… our text says you get some coins but the player didn’t actually get anything. That’s a problem we’ll solve now.
Rewards are ACTIONS. There are many kinds of Actions, we’ll do the simplest of giving the player gold. We do this by adding an ACTION right after our text.
I’m not going to really get into it, but there is a difference in JSON between lists of things to do and singular things to do. We have to make a container list of ActionS surrounded by square brackets [ ] in which we place our Action.
Under our “text” for the final screen, we add this:
"actions": [
	{
		"action": "ReceiveGold",
		"name1": "By",
		"value1": "50"
	}
]
This is what the whole thing looks like now:
{
 "$schema": "../../Schemas/HexEvents.schema.json",
 "guid": "ExampleFirstEvent",
 "title": "A Discarded Pack",
 "tags": [ "Random" ],
 "displayAs": "Random",
 "root": {
  "text": "You find a discarded pack beside the road. The leather is cracked with age, but it has not been opened.",
  "options": [
   {
    "text": "Open the pack",
    "next": {
     "text": "Inside the pack you find a few personal items and a handful of coins. Whoever owned this did not make it far.",
     "actions": [
      {
       "action": "ReceiveGold",
       "name1": "By",
       "value1": "50"
      }
     ]
    }
   }
  ]
 }
}
And now it behaves as expected. We can have our celebratory ice cream, or a second if you already did!
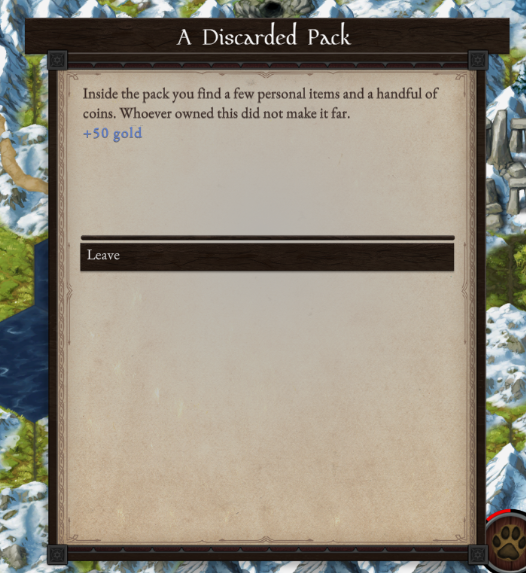
Notice the game prints in special text whatever reward was received, so you don’t have to specify anything.
Now, as proper game designers we don’t normally specify an exact amount of gold. Why? Because the economy of the game is in flux, maybe 50g is a lot, maybe it’s peanuts. It would really suck to have to change ALL of the JSON every time there is an update to the economy scale. How to solve this?
We reward based on ‘tier’ sizes. In this case it wasn’t a hard fought battle, an incredible risk, we just want to reward the player with a small amount of coins. So we write it like this:
{ "action": "ReceiveGold", "name1": "ByTier", "value1": "small" },
That allows us devs to define in the game what a small amount of gold is and only update that one place when the economy changes.
We can also do this for items, by using predefined “loot tables”, the game will select an item from a premade treasure list. A ‘small’ provides a torch, or ration, or other low value item. A ‘large’ provides something expensive, like a gem or statue. We do it like this with ‘small’, ‘medium’, ‘large’:
{ "action": "ReceiveItem", "name1": "ByTier", "value1": "large" },I just ran the event twice with the large tier item. Got a small painting, then an engraved lockpick. Valuable stuff indeed!
4. Adding Choices
With our basic event working, the next step is adding more options for a different outcome, reward, or consequence.
Adding two or more options
To add choices, you put multiple entries in the options list. Each option needs:
text: what the button saysnext: what the player sees after clicking it
We’re going to add two more options:
To cut it open, which provides less gold reward
IF (and only if) the player has fire skill over a certain amount (2 in this case), the option will display to burn the pack up and gain magical XP.
{
  "$schema": "../../Schemas/HexEvents.schema.json",
  "guid": "ExampleFirstEvent",
  "title": "A Discarded Pack",
  "tags": [ "Random" ],
  "displayAs": "Random",
  "root": {
    "text": "You find a discarded pack beside the road. The leather is cracked with age, but it has not been opened.",
    "options": [
      {
        "text": "Open the pack",
        "next": {
          "text": "Inside the pack you find a few personal items and a handful of coins. Whoever owned this did not make it far.",
          "actions": [
            {
              "action": "ReceiveGold",
              "name1": "By",
              "value1": "25"
            }
          ]
        }
      },
      {
        "text": "Cut it open",
        "next": {
          "text": "You slice the pack open. Whatever was inside has long since been picked clean, but a few loose coins spill into the dirt.",
          "actions": [
            {
              "action": "ReceiveGold",
              "name1": "By",
              "value1": "10"
            }
          ]
        }
      },
      {
        "text": "Burn it with fire",
        "showIf": [
          {
            "prereq": "CheckStat",
            "name1": "School",
            "value1": "Fire",
            "name2": "Value",
            "value2": "2"
          }
        ],
        "next": {
          "text": "You reduce the pack to ash in seconds. Whatever secrets it once held are gone, but the act is strangely satisfying.",
          "actions": [
            {
              "action": "ReceiveMagicXP",
              "name1": "School",
              "value1": "Fire",
              "name2": "Tier",
              "value2": "Small"
            }
          ]
        }
      }
    ]
  }
}
Step 5: Skill Checks
Players are playing to control outcomes. Random is fine occasionally, but being based on something the player controls is ideal. Test the player using a skill check and provide outcomes based on success or failure.
A skill check rolls a d20, adds the relevant player stat, and compares the total to a Difficulty Class (DC) you define. Based on the result, the event continues down a success or failure path.
From a writer’s perspective, a skill check answers one question:
Does this work, or does it go wrong?
What a skill check requires
Every skill check must define all of the following:
skill
Which player stat is being tested (for example: Stealth, Scholarship)DC
How difficult the action issuccess
What the player sees and receives if the check succeedsfailure
What the player sees if the check fails
If any of these are missing, the event will not work.
Example: Stealth check
In this example, the player attempts to pick a lock.
Plain-language flow:
The player chooses Pick the lock
A Stealth check is rolled against DC 10
On success, they gain extra coins
On failure, the lock is ruined and nothing is gained
      {
        "text": "Pick the lock",
        "next": {
          "skill": "Stealth",
          "DC": "10",
          "success": {
            "text": "You work the clasp patiently until it clicks open. Inside, tucked into the lining, you find a second pouch of coins.",
            "actions": [
              {
                "action": "ReceiveGold",
                "name1": "By",
                "value1": "50"
              }
            ]
          },
          "failure": {
            "text": "You fumble with the clasp until the brittle leather gives way. Whatever mechanism held it shut is ruined, and you gain nothing for the effort."
          }
        }
      },
How the roll works
Behind the scenes, the game:
Rolls a d20
Adds the player’s skill value
Compares the total to the DC
Chooses an outcome
By default, this roll is hidden from the player.
Sometimes it is more exciting to see the roll happen before getting the outcome, like if the player is running away from rabid dogs. If the attribute showPopup is set to true, the full roll is shown using the skill check popup. Just throw it on the end after the failure node like this:
},
"showPopup": true
}
Here is the full skill check with the popup turned on.
{
 "$schema": "../../Schemas/HexEvents.schema.json",
 "guid": "ExampleFirstEvent",
 "title": "A Discarded Pack",
 "tags": [ "Random" ],
 "displayAs": "Random",
 "root": {
  "text": "You find a discarded pack beside the road. The leather is cracked with age, but it has not been opened.",
  "options": [
   {
    "text": "Open the pack",
    "next": {
     "text": "Inside the pack you find a few personal items and a handful of coins. Whoever owned this did not make it far.",
     "actions": [
      {
       "action": "ReceiveGold",
       "name1": "By",
       "value1": "25"
      }
     ]
    }
   },
   {
    "text": "Cut it open",
    "next": {
     "text": "You slice the pack open. Whatever was inside has long since been picked clean, but a few loose coins spill into the dirt.",
     "actions": [
      {
       "action": "ReceiveGold",
       "name1": "By",
       "value1": "10"
      }
     ]
    }
   },
   {
    "text": "Pick the lock",
    "next": {
     "skill": "Stealth",
     "DC": "10",
     "success": {
      "text": "You work the clasp patiently until it clicks open. Inside, tucked into the lining, you find a second pouch of coins.",
      "actions": [
       {
        "action": "ReceiveGold",
        "name1": "By",
        "value1": "50"
       }
      ]
     },
     "failure": {
      "text": "You fumble with the clasp until the brittle leather gives way. Whatever mechanism held it shut is ruined, and you gain nothing for the effort."
     },
     "showPopup": true
    }
   },
   {
    "text": "Burn it with fire",
    "showIf": [
     {
      "prereq": "CheckStat",
      "name1": "School",
      "value1": "Fire",
      "name2": "Value",
      "value2": "2"
     }
    ],
    "next": {
     "text": "You reduce the pack to ash in seconds. Whatever secrets it once held are gone, but the act is strangely satisfying.",
     "actions": [
      {
       "action": "ReceiveMagicXP",
       "name1": "School",
       "value1": "Fire",
       "name2": "Tier",
       "value2": "Small"
      }
     ]
    }
   }
  ]
 }
}
6. Branching Deeper
We can use what we have to make more complex and interesting interactions by branching further. You don’t have to do much, just going from 1 layer to 2 or 3 layers deep is plenty.
We’re going to make the lock picking slightly more interesting (and replayable!). If the player succeeds on the lock pick, there will now be a chance to perceive something funny about the lining of the pack.
If the player succeeds the perception check, a further option to check the lining appears, and a further reward is given.
If the player fails the perception check, they don’t know there was anything there to find, and the event ends there.
   {
    "text": "Pick the lock",
    "next": {
     "skill": "Stealth",
     "DC": "10",
     "success": {
      "skill": "Perception",
      "DC": "5",
      "success": {
       "text": "The clasp releases and you find a small pouch of coins.\nThere is something odd about the stitching.",
       "actions": [
        { "action": "ReceiveGold", "name1": "By", "value1": "20" }
       ],
       "options": [
        {
         "text": "Check Lining",
         "next": {
          "text": "Ingeniusly sewn into the lining is a perfect set of shiny gold coins, more than the initial pouch.",
          "actions": [
           { "action": "ReceiveGold", "name1": "By", "value1": "40" }
          ]
         }
        }
       ]
      },
      "failure": {
       "text": "The clasp releases and you find a small pouch of coins.",
       "actions": [
        { "action": "ReceiveGold", "name1": "By", "value1": "20" }
       ]
      }
     },
     "failure": {
      "text": "You fumble with the clasp until the brittle leather gives way. Whatever mechanism held it shut is ruined, and you gain nothing for the effort."
     }
Notice how we now have to duplicate the success output of 20 gold, to handle both branches.
This is a good example of “it probably can do what you want, but it may not be pretty” 😛. Such is the nature of game content design work - just do what it takes to get it working.
Here is the whole event, tested just now at the time of this writing.
{
 "$schema": "../../Schemas/HexEvents.schema.json",
 "guid": "ExampleFirstEvent",
 "title": "A Discarded Pack",
 "tags": [ "Random" ],
 "displayAs": "Random",
 "root": {
  "text": "You find a discarded pack beside the road. The leather is cracked with age, but it has not been opened.",
  "options": [
   {
    "text": "Open the pack",
    "next": {
     "text": "Inside the pack you find a few personal items and a handful of coins. Whoever owned this did not make it far.",
     "actions": [
      {
       "action": "ReceiveGold",
       "name1": "By",
       "value1": "25"
      }
     ]
    }
   },
   {
    "text": "Cut it open",
    "next": {
     "text": "You slice the pack open. Whatever was inside has long since been picked clean, but a few loose coins spill into the dirt.",
     "actions": [
      {
       "action": "ReceiveGold",
       "name1": "By",
       "value1": "10"
      }
     ]
    }
   },
   {
    "text": "Pick the lock",
    "next": {
     "skill": "Stealth",
     "DC": "10",
     "success": {
      "skill": "Perception",
      "DC": "5",
      "success": {
       "text": "The clasp releases and you find a small pouch of coins.\nThere is something odd about the stitching.",
       "actions": [
        { "action": "ReceiveGold", "name1": "By", "value1": "20" }
       ],
       "options": [
        {
         "text": "Check Lining",
         "next": {
          "text": "Ingeniusly sewn into the lining is a perfect set of shiny gold coins, more than the initial pouch.",
          "actions": [
           { "action": "ReceiveGold", "name1": "By", "value1": "40" }
          ]
         }
        }
       ]
      },
      "failure": {
       "text": "The clasp releases and you find a small pouch of coins.",
       "actions": [
        { "action": "ReceiveGold", "name1": "By", "value1": "20" }
       ]
      }
     },
     "failure": {
      "text": "You fumble with the clasp until the brittle leather gives way. Whatever mechanism held it shut is ruined, and you gain nothing for the effort."
     }
    }
   },
   {
    "text": "Burn it with fire",
    "showIf": [
     {
      "prereq": "CheckStat",
      "name1": "School",
      "value1": "Fire",
      "name2": "Value",
      "value2": "2"
     }
    ],
    "next": {
     "text": "You reduce the pack to ash in seconds. Whatever secrets it once held are gone, but the act is strangely satisfying.",
     "actions": [
      {
       "action": "ReceiveMagicXP",
       "name1": "School",
       "value1": "Fire",
       "name2": "Tier",
       "value2": "Small"
      }
     ]
    }
   }
  ]
 }
}
7. Randomization
Now for the final lesson - how to randomize entrances and outcomes in an event.
This is done by defining multiple stages at the same point in the event and letting the game choose one at random.
To do this, replace a single block of text with a stages list.
Each entry in stages is a complete alternative version of the scene. Only one of them will ever be shown when the event triggers.
For example, in DeadNote01, the player might find:
a military courier with an undelivered order,
a naturalist with a field journal,
or a sealed scroll case hiding a valuable painting.
All three are written as separate stages under the same root.
Biasing the Result
Alongside stages, you must add a weights list.
The weights let you gently guide how often each version appears without making it predictable.
Higher numbers mean that stage is more common.
Lower numbers mean it is rarer.
Writers do not need to make the numbers add up to anything specific.
The important rule is simple:
There must be one weight for each stage.
The order of weights must match the order of stages.
In DeadNote01, the root stages all use the same weight, so each version of the corpse is equally likely.
Randomization Inside Outcomes
Randomization is not limited to the start of an event.
You can also use stages and weights deeper inside the event, usually after a skill check or discovery.
In DeadNote01, if the player succeeds at opening the scroll case, the painting they recover is randomized:
most of the time it is small,
sometimes it is medium,
rarely it is large.
This keeps rewards from feeling scripted while still respecting difficulty and rarity.
Here is DeadNote01, one of the simpler events in the game, demonstrating randomization and how to present an option but circle back to the same stage and no longer display it (Search Body) with hideIf.
{
 "$schema": "../../Schemas/HexEvents.schema.json",
 "guid": "DeadNote01",
 "title": "The Dead Note",
 "tags": [ "Random" ],
 "displayAs": "Random",
 "root": {
  "stages": [
   {
    "text": "A rotted corpse lies sprawled on the ground. As you move it, a note beneath its body comes into view.\n\n\n\nA rotted corpse lies sprawled on the ground. As you move it, a note beneath its body comes into view.",
    "LABEL": "S1-OPTIONS",
    "options": [
     {
      "text": "Examine body",
      "hideIf": [
       {
        "prereq": "HasSeen",
        "name1": "Flag",
        "value1": "S1_ExaminedBody"
       }
      ],
      "actions": [
       {
        "action": "MarkSeen",
        "name1": "Flag",
        "value1": "S1_ExaminedBody"
       }
      ],
      "next": {
       "text": "Light leathers cling to the remains, cut for movement rather than defense. The belt once held several pouches, now rotted through. There is a disciplined economy to the gear. This was likely a military courier.",
       "USE": "S1-OPTIONS"
      }
     },
     {
      "text": "Examine note",
      "next": {
       "text": "It is an attack order, written years ago for a minor engagement. The missive never reached its destination. You cannot help but wonder how differently events might have unfolded had it arrived.\n\nPressed into the dirt beneath the note is a small pouch of coins, likely meant for road tolls or gate fees.",
       "actions": [
        {
         "action": "ReceiveGold",
         "name1": "ByTier",
         "value1": "small"
        }
       ]
      }
     }
    ]
   },
   {
    "text": "A rotted corpse lies face-down in the dirt. As you shift the body, a cracked leather journal tumbles forth, its pages warped from damp.",
    "options": [
     {
      "text": "Examine journal",
      "next": {
       "text": "The journal contains observations of plants, diagrams of flowers, and notes on blooming seasons. The writing is careful and methodical, clearly the work of someone who knew the land well.",
       "actions": [
        { "action": "ReceiveMagicXP", "name1": "School", "value1": "Earth", "name2": "Tier", "value2": "Small" },
        { "action": "ReceiveSkillXP", "name1": "Skill", "value1": "Survival", "name2": "ByTier", "value2": "small" }
       ]
      }
     }
    ]
   },
   {
    "text": "A rotted corpse lies sprawled in the dirt. As you shift the body, you spot a scroll case half-buried beside the body. Dented, but still sealed tight.",
    "options": [
     {
      "text": "Open scroll case",
      "next": {
       "skill": "Scholarship",
       "DC": 10,
       "success": {
        "text": "With careful pressure, you slide the contents free without tearing the brittle canvas. The painting revealed is expertly done, far finer than you expected to find here.",
        "stages": [
         {
          "text": "You secure the painting and roll it carefully for travel.",
          "actions": [
           { "action": "ReceiveItem", "name1": "ByID", "value1": "Small Painting" }
          ]
         },
         {
          "text": "You secure the painting and roll it carefully for travel.",
          "actions": [
           { "action": "ReceiveItem", "name1": "ByID", "value1": "Medium Painting" }
          ]
         },
         {
          "text": "You secure the painting and roll it carefully for travel.",
          "actions": [
           { "action": "ReceiveItem", "name1": "ByID", "value1": "Large Painting" }
          ]
         }
        ],
        "weights": [ 60, 25, 15 ]
       },
       "failure": {
        "text": "As you pull the contents free, the canvas catches and tears. The brittle fabric gives way in your hands, leaving the painting ruined beyond repair."
       }
      }
     }
    ]
   }
  ],
  "weights": [ 33, 33, 33 ]
 }
}
Weights are placed at the end of a group, which is a little sucky, but it is what it is.
B) Event Structure Reference
This section lists the available fields you can use when writing events, what they do, and where they are valid.
Top Level Fields
These define the event itself.
$schema
Points to the schema file. Required. Writers should not change this.guid
Unique ID for the event. Must be unique across all events.title
The event title shown to the player.tags
List of categories for the event. Common values includeRandom.displayAs
How the event is labeled on the map. UsuallyRandom.root
The starting node of the event. Everything flows from here.
Common Node Fields
These fields can appear almost anywhere inside an event node.
text
The narrative text shown to the player.
New lines are written using\n.options
A list of player choices. If no options are present, the event ends.actions
Things that happen immediately when the node is entered.
Rewards, XP, flags, and items are all handled here.next
The next node to move to after choosing an option.
Options
Options represent clickable player choices.
Each option can contain:
text
The text shown on the button.next
What happens after selecting this option.actions
Actions that occur immediately when the option is chosen.showIf
Conditions that must be true for this option to appear.hideIf
Conditions that hide the option if true.
Conditions (showIf / hideIf)
Conditions control visibility of options.
Each condition entry contains:
prereq
The type of check being made.name1,value1,name2,value2
Parameters for the check.
Common uses include:
Checking if a flag has been seen
Checking skill levels
Checking magic schools or stats
Available Prereq Types
This section lists every prereq writers can use.
HasSeen
Checks whether a flag has already been marked.
Used to prevent repeating the same action.
Example:
Hide an option after it has been used once
{
  "prereq": "HasSeen",
  "name1": "Flag",
  "value1": "S1_ExaminedBody"
}
Typically paired with the MarkSeen action.
CheckSkill
Checks the player’s skill level.
Example:
Only show an option if Scholarship is at least 3
{
  "prereq": "CheckSkill",
  "name1": "Skill",
  "value1": "Scholarship",
  "name2": "Value",
  "value2": "3"
}
This does not roll. It is a flat requirement.
CheckStat
Checks a character stat or magic school level.
Example:
Require Fire school level 2
{
  "prereq": "CheckStat",
  "name1": "School",
  "value1": "Fire",
  "name2": "Value",
  "value2": "2"
}
Common uses:
Magic schools
Core stats
Permanent character traits
CheckGold
Checks current gold amount.
Example:
Only show if the player has at least 100 gold
{
  "prereq": "CheckGold",
  "name1": "AtLeast",
  "value1": "100"
}
Useful for bribes, tolls, or purchases.
CheckItem
Checks if the player has a specific item.
Example:
Only show if the player has a Bandage
{
  "prereq": "CheckItem",
  "name1": "ByID",
  "value1": "Bandage"
}
CheckReputation
Checks reputation level.
Example:
Only show if reputation with nearest town is medium or higher
{
  "prereq": "CheckReputation",
  "name1": "WithTown",
  "value1": "Nearest",
  "name2": "AtLeast",
  "value2": "medium"
}
CheckWellbeing
Checks current wellbeing.
Example:
Only show if wellbeing is at least 25
{
  "prereq": "CheckWellbeing",
  "name1": "AtLeast",
  "value1": "25"
}
CheckStamina
Checks stamina level.
Example:
Hide option if stamina is below 10
{
  "prereq": "CheckStamina",
  "name1": "Below",
  "value1": "10"
}
CheckHP
Checks current health.
Example:
Only show if HP is above 1
{
  "prereq": "CheckHP",
  "name1": "Above",
  "value1": "1"
}
Blackboard Conditions
Checks temporary variables set earlier in the event.
Example:
Only show if Age was set to Old
{
  "prereq": "CheckBlackboard",
  "name1": "Variable",
  "value1": "Age",
  "name2": "Equals",
  "value2": "Old"
}
Blackboard checks are event-local and reset when the event ends.
Multiple Conditions
You can require more than one condition.
Example:
Must have examined the body and have Fire 2
"showIf": [
  { "prereq": "HasSeen", "name1": "Flag", "value1": "S1_ExaminedBody" },
  { "prereq": "CheckStat", "name1": "School", "value1": "Fire", "name2": "Value", "value2": "2" }
]
Both must pass.
Common Patterns
One-Time Options
Use hideIf + HasSeen.
Skill-Locked Choices
Use showIf + CheckSkill.
Discovery Chains
Use MarkSeen and HasSeen to reveal deeper options.
Resource Gates
Use CheckGold, CheckStamina, or CheckHP.
Writer Guidance
If an option is hidden, the player never sees it.
Do not hide options without narrative justification.
Prefer revealing options over removing them silently.
Conditions should explain why a choice is available or not.
Skill Checks
Skill checks live inside a next block.
Fields:
skill
The skill being tested.DC
The difficulty of the check.success
Node shown if the check succeeds.failure
Node shown if the check fails.
A skill check replaces normal text at that node. One of the outcomes is always chosen.
Stages (Randomization)
Stages allow one of several possible outcomes to be chosen at random.
Fields:
stages
A list of complete alternative nodes. Only one is used.weights
A list of numbers that bias how often each stage appears.
Rules:
One weight per stage.
Order matters.
Stages can appear at the root or deep inside an event.
Reusing Sections
These fields let writers reuse content without duplicating it.
LABEL
Assigns a name to a node so it can be reused later.USE
Jumps back to a labeled node.
This is useful for inspection loops or repeated option sets.
Actions Reference
Actions are executed immediately when their node is entered.
They are written inside an actions array.
Each action uses the format:
{ "action": "ActionName", "name1": "...", "value1": "...", ... }
Gold
Give Gold
By tier
{ "action": "ReceiveGold", "name1": "ByTier", "value1": "small" }
{ "action": "ReceiveGold", "name1": "ByTier", "value1": "medium" }
{ "action": "ReceiveGold", "name1": "ByTier", "value1": "large" }
Fixed amount
{ "action": "ReceiveGold", "name1": "By", "value1": "100" }
Lose Gold
Fixed amount
{ "action": "LoseGold", "name1": "ByAmount", "value1": "100" }
Percentage
{ "action": "LoseGold", "name1": "ByPercent", "value1": "25" }
Percentage with caps
{ "action": "LoseGold", "name1": "ByPercent", "value1": "25", "name2": "Max", "value2": "50000" }
{ "action": "LoseGold", "name1": "ByPercent", "value1": "25", "name2": "Min", "value2": "200", "name3": "Max", "value3": "50000" }
Items
Receive Items
By tier
{ "action": "ReceiveItem", "name1": "ByTier", "value1": "small" }
{ "action": "ReceiveItem", "name1": "ByTier", "value1": "medium" }
{ "action": "ReceiveItem", "name1": "ByTier", "value1": "large" }
By ID or GUID
{ "action": "ReceiveItem", "name1": "ByID", "value1": "Bandage" }
{ "action": "ReceiveItem", "name1": "ByGuid", "value1": "Bandage" }
From variable
{ "action": "ReceiveItem", "name1": "FromVariable", "value1": "GIFT" }
Lose Item
{ "action": "LoseItem", "name1": "ByID", "value1": "Bandage" }
Generated Weapons
Generate and store
{ "action": "GenerateRandomWeapon", "name1": "Type", "value1": "ShortSword", "name2": "Quality", "value2": "Excellent", "name3": "TO", "value3": "GIFT" }
Receive random weapon
{ "action": "ReceiveRandomWeapon" }
Giftable Items
{ "action": "ReceiveGiftable", "name1": "ID", "value1": "WorgPup" }
Gems
By tier
{ "action": "ReceiveGem", "name1": "ByTier", "value1": "small" }
{ "action": "ReceiveGem", "name1": "ByTier", "value1": "medium" }
{ "action": "ReceiveGem", "name1": "ByTier", "value1": "large" }
Specific gem
{ "action": "ReceiveGem", "name1": "Gem", "value1": "Amethyst" }
{ "action": "ReceiveGem", "name1": "Gem", "value1": "BlackPearl" }
{ "action": "ReceiveGem", "name1": "Gem", "value1": "RedDiamond" }
Books
{ "action": "ReceiveBook" }
Magic School XP
Gain
{ "action": "ReceiveMagicXP", "name1": "School", "value1": "Ice", "name2": "Tier", "value2": "Small" }
{ "action": "ReceiveMagicXP", "name1": "School", "value1": "Random", "name2": "Tier", "value2": "Medium" }
Lose
{ "action": "LoseMagicXP", "name1": "School", "value1": "Fire", "name2": "Amount", "value2": "50" }
{ "action": "LoseMagicXP", "name1": "School", "value1": "Random", "name2": "Amount", "value2": "All" }
{ "action": "LoseMagicXP", "name1": "School", "value1": "HighestNonZero", "name2": "Amount", "value2": "All" }
{ "action": "LoseMagicXP", "name1": "School", "value1": "LowestNonZero", "name2": "Amount", "value2": "All" }
Skill XP
By tier
{ "action": "ReceiveSkillXP", "name1": "Skill", "value1": "Scholarship", "name2": "ByTier", "value2": "small" }
Fixed amount
{ "action": "ReceiveSkillXP", "name1": "Skill", "value1": "Scholarship", "name2": "By", "value2": "10" }
Monster Lore
{ "action": "ReceiveMonsterLore", "name1": "Race", "value1": "Goblin" }
{ "action": "ReceiveMonsterLore", "name1": "Race", "value1": "[patrol.lair.race.name]" }
Reputation
{ "action": "IncreaseReputation", "name1": "WithTown", "value1": "Nearest", "name2": "ByTier", "value2": "small" }
Hex Events
Spawn Event
{ "action": "SpawnHexEvent", "name1": "ByTag", "value1": "Tracks-Found", "name2": "Radius", "value2": "3" }
{ "action": "SpawnHexEvent", "name1": "ByGuid", "value1": "Captive02-PostBattle", "name2": "At", "value2": "Here" }
Directional
{ "action": "SpawnHexEvent", "name1": "ByGuid", "value1": "Captive02-PostBattle", "name2": "Direction", "value2": "East", "name3": "Distance", "value3": "Far" }
Switch Event
{ "action": "SwitchToHexEvent", "name1": "ByGuid", "value1": "Captive02-PostBattle" }
Queue Event
{ "action": "QueueHexEvent", "name1": "ByGuid", "value1": "CheeboRevenge01" }
{ "action": "QueueHexEvent", "name1": "ByGuid", "value1": "CheeboRevenge01", "name2": "In", "value2": "4" }
Wellbeing
{ "action": "IncreaseWellbeing", "name1": "By", "value1": "10" }
{ "action": "DecreaseWellbeing", "name1": "By", "value1": "10" }
Stamina
{ "action": "GainStamina", "name1": "Amount", "value1": "20" }
{ "action": "LoseStamina", "name1": "Amount", "value1": "20" }
{ "action": "GainStamina", "name1": "RestoreTo", "value1": "Full" }
{ "action": "ReduceToOneStamina" }
Health (HP)
Damage
{ "action": "TakeDamage", "name1": "Amount", "value1": "chip", "name2": "Type", "value2": "Fire" }
{ "action": "TakeDamage", "name1": "Amount", "value1": "10", "name2": "Type", "value2": "Arcane" }
Restore
{ "action": "RestoreHP", "name1": "Amount", "value1": "5" }
{ "action": "RestoreHP", "name1": "RestoreTo", "value1": "Full" }
Set
{ "action": "ReduceToOneHP" }
Combat
Standard flow
{ "action": "SpawnPatrolHere" }
{ "action": "GenerateBattlePlan" }
{ "action": "SpawnBattle" }
Variants
{ "action": "SpawnPatrolHere", "name1": "Type", "value1": "Goblin" }
{ "action": "SpawnBattle", "name1": "WithAmbusher", "value1": "Player" }
Variables and Blackboard
Pick items
{ "action": "PickFoodItem", "name1": "By", "value1": "Cheapest" }
{ "action": "PickItems", "name1": "Quality", "value1": "Common", "name2": "Quantity", "value2": "3" }
Set blackboard
{ "action": "SetBlackboardValue", "name1": "Variable", "value1": "Age", "value2": "Young", "value3": "Adult", "value4": "Old" }
Increment
{ "action": "IncrementBlackboardValue", "name1": "Variable", "value1": "Age", "name2": "By", "value2": "10" }
Flags
{ "action": "MarkSeen", "name1": "Flag", "value1": "PlayerChoseViolence" }
Miscellaneous
{ "action": "AddOutcome", "name1": "Text", "value1": "[Martha.name] will remember this." }
{ "action": "RevealLair" }
{ "action": "PlaySFX", "value1": "Coins" }